07 November 2007

Application Supplied System Properties

We added a feature in the 10.1.3.1 release which enables an application to supply its own set of System properties, which are added and removed to the global System property set as the application is started and stopped. The documentation for it is not extensive, but there's a how-to on OTN which walks through the use of it.

Check it out on OTN.

The System properties (name, value) are defined in the orion-application.xml descriptor provided with the application.

<orion-application>
<property name="application.tax.rate" value="10" />
<property name="application.tax.code" value="AU" />
</orion-application>
During deployment with ASC, the deployment plan editor can be used to view the set of specified System properties in the application. It can also be used to add, remove, edit the defined properties so they can be tailored to the specific deployment being performed.

05 November 2007

Run a Coherence Cache Server from JDeveloper

I was working on a Coherence based handson lab for the upcoming Open World conference last week. The lab configures Coherence to use a JPA based CacheStore to store/load cache entries into/from a database.

The labs are all based around an Ant script that runs the lab code, plus the Cache Servers. But one handy thing that could have been documented in the labs is the ability to run a Cache Server(s) directly from JDeveloper using its "Run Manager".

Here's how it works:

1. Have a project set up which has the Coherence JAR files added as a library.

2. Create a new Run Configuration for your Cache Server.

3. In the "Default Run Target" field enter:

C:\coherence-ejb3\coherence\lib\tangosol.jar!\com\tangosol\net\DefaultCacheServer.class

4. Specify any additional JVM or Coherence properties as desired.

Click save and you're done.


Now to run a Cache Server, simply select your Cache Server run target from the list and the Cache Server will start. A log window will open up showing the output from the Cache Server. The process running the Cache Server will be shown in the Process Manager window.


The other Run Configuration I found helpful was to launch the Console that comes with Coherence. This little application is a cache client, and allows you to interactively perform operations against the cache. Handy to quickly see the size of a cache or list out some elements from the cache to see that its containing the expected data objects.

To run this Coherence application, you create a new Run Configuration as above, except specifying the Default Run Target as:

C:\coherence-ejb3\coherence\lib\coherence.jar!\com\tangosol\coherence\component\application\Console.class


Since the Coherence console is an interactive application, one extra little step you need to do here is to enable "Allow Program Input" for this running process.

In the Run Configuration dialog, select the "Tool Settings" node and then check the "Allow Program Input" option.


Save the entry and execute it. You should then the Coherence Console application fire up and prompt for your command in the "Input: [ ]" field.


25 October 2007

Locating the process that has a specific network port open

Ever tried to start a process on Windows, only to be told that the network port it needs is unavailable?

TNSLSNR for 32-bit Windows: Version 10.2.0.1.0 - Production
Error listening on: (DESCRIPTION=(ADDRESS=(PROTOCOL=TCP)(HOST=mypc.oracle.com)(PORT=1521)))
TNS-12542: TNS:address already in use

Bugger. Now, which process is using that port? The task manager doesn't show you any of these sorts of details.

There's two ways I know of to work out which process which already has the port open.

1. If you have cygwin or MKS or some Unix styled set of command utilities -and who using Windows commands shells wouldn't? -- then you can use the grep and ps commands it provides with the standard netstat command.

First off, use the netstat command with the -ao switch and pipe it into grep to locate the listening details. The -o switch tells netstat to output the process-id of the owner of the port.

D:\>netstat -ao | grep 1521
TCP mypc:1521 mypc:0 LISTENING 2944

Then using the ps command, search for the process-id:

D:\>ps -eaf | grep 2944
SYSTEM 2944 1488 0 11:37:44 CONIN$ 0:00 vmware-authd

This could be combined into a nice awk script I suspect.

2. Use the very handy SysInternals utilities to locate the owning process. These used to be available on the sysinternals.com website, but the site now redirects to Microsoft, so presumably they have purchased them. Good idea Microsoft.

The specific utility for this operation is TCPView:

http://www.microsoft.com/technet/sysinternals/utilities/TcpView.mspx

This comes in two flavours, GUI and cmd line and identifies each process that is using a network port. The GUI is easy to use, just fire it up, look for the port in question which then identifies the process in the process table.

I prefer using the command line utility, tcpvcon.exe.

This results in a nicely formatted text output that shows the process and network port details for all processes that have a network port in use in some manner.

D:\>tcpvcon.exe -a
...
[TCP] vmware-authd.exe
PID: 2944
State: ESTABLISHED
Local: mypc:1521
Remote: mypc:0
...

To make it easier to identify a specific process which owns a specific port, then you can ask the output to be provided in CSV format, which lists each process on a single line, and which you can then pipe into find to locate a specific port

D:\>tcpvcon.exe -c -a | find "1521"
TCP,VMNET.EXE,2944,LISTENING,mypc:1521,mypc:0

----------------
Listening to: John Butler Trio - Good Excuse

11 October 2007

OC4J 10.1.3.3 Ant Taskname Error

OC4J 10.1.3.x supplies a set of Ant tasks that enable operations such as application deployment, resource configuration and server lifecycle tasks to be performed.

The abridged history of the tasks is:
  • OC4J 10.1.3.0 introduced the basic tasks
  • OC4J 10.1.3.1 and later versions extends the set of tasks to support JDBC/JMS resource configuration options and server shutdown/restart tasks
The OC4J Configuration and Administration guide documents the Ant tasks.

However in the OC4J 10.1.3.3 release several of the tasks are incorrectly defined in the antlib.xml and therefore not available using the names as described in the documentation.

The documentation is correct and shows how the tasks should be named. However if you use these tasks as documented you will get errors. The screen capture below highlights the specific differences.


The workarounds are either:

1. Revert to using the names as defined in antlib.xml for these tasks:

  • addDataSourceConnectionPool == createJDBCConnectionPool
  • addManagedDataSource == createManagedDataSource
  • addNativeDataSource == createNativeDataSource
  • testDataSourceConnectionPool == testConnectionPool
2. Update the /j2ee/utilities/ant-oracle-classes.jar!/oracle/antlib.xml to change the names of the tasks so they reflect the correct names as specified in the documentation:

Change: taskdef name="createJDBCConnectionPool"
To: taskdef name="addDataSourceConnectionPool"

Change: taskdef name="createManagedDataSource"
To: taskdef name="addManagedDataSource"

Change: taskdef name="addManagedDataSource"
To: taskdef name="createNativeDataSource"

Change: taskdef name="testConnectionPool"
To: taskdef name="testDataSourceConnectionPool"

A bug has been filed for this and a patch will be released which fixes the issue along the lines of option 2 shown above.

08 October 2007

Bring on UST + Stans

My Turner Flux is shod with a Mavic Crossmax SL wheelset which is UST compatible. I've been riding it with tubes + Maxxis Crossmarks (which I think are awesome) so far since I've been a bit slow to pick up some UST tires -- I'm commerced out I think. Plus I also figured with all the other knobs and dials to tweak, I had enough new stuff to worry about.

But last Friday some new Maxxis Crossmax LUSTs I'd purchased arrived. I was hoping to put them on over the but I didn't quite get a chance to do.

And as fate or that little Irish Murphy bloke would have it, my early Monday morning blast around the Eagle MTB park resulted in a pinch flat just at the end of the SouthSide trail.

I didn't have a spare tube, but thought I was lucky that I had some patches. But of course that little Murphy bloke, smiling ever more cunningly at this stage, somehow conspired to make the CO2 cartridge I carry to refill a tube be empty.

Bugger, a 2km walk, mostly uphill back to the car.

Yes, it's my fault, I know. Always carry a spare tube and a full canister. And if you use the spare tube, make sure you buy another one to replace it. And check the canister occasionally.

The good thing is this means I now have a hard requirement to put on the USTs. I picked up some Stans sealant from Pete at BMCR, so hopefully I won't be suffering too many more punctures.

But I'll will carry a spare tube just in case.

Update: Job done!

I just spent an short while out in the shed fitting the UST tires to the wheels. It's pretty straightforward to do. I think the best piece of advice I received was to do the initial inflation using an air compressor, to get enough volume into the tire to push the beads into place in the rim. The beauty of the Mavic wheelset I discovered is that they provide you with a schraeder screw-on adapter, which lets you use the standard car tire type fitting to pump out the tire. Once the tire is seated, deflate it and make sure there are no points around the rim where the bead has come away. Once you are satisfied pump it back up to the desired using a floor pump. Easy!

Adding Stans was easy too -- just read the direction and make sure you follow the inversion tips to ensure the micro particles are in the sealant portion being added to the tire. Unset the bead from a small portion of the tire, tip in the sealant, reseat and you are done.

Total time was about 30 mins for the first tire, with a bit of mucking around and working out how to do it. The next tire took about 5 minutes to do.

Should be able to get out for a few trails this weekend, I'll update this note when I see how they ride.

Update: Stans 1, Blue Gums 0

Out on my early monday morning ride, cruising across the top of the Blue Gums trail -- which is quite rocky -- I heard a noise that I thought sounded like I had something stuck in my spokes. It went away before I could stop to check it out. When I did stop, I saw a white patch on my tire. Ahh, Stans to the rescue. I must have punctured on a sharp rock and Stans sealed it up almost immediately. I lost a little pressure, but it was still very rideable and got me back to the car easily. Sure beats walking. Pumped it back up at the car and there was no further leakage.

Rock on Stan!

28 September 2007

Using JAXB 2.0 with OC4J 10.1.3.x

OC4J 10.1.3.x provides a JAXB 1.0 implementation as part of its standard runtime. If you want to use JAXB 2.x then its easy to do using the shared-library mechanism of OC4J.

As a simple test of the JAXB 2.0 capabilities, a simple application can be used that makes use of the JAXB 2.0 features. In the example used herein, the application is a simple Web application that makes use of two POJOs that are annotated with JAXB 2.0 annotations.

Build a Test Application:
package sab.demo.jaxb.model;

import java.util.ArrayList;

import javax.xml.bind.JAXBContext;
import javax.xml.bind.JAXBException;
import javax.xml.bind.Marshaller;
import javax.xml.bind.annotation.*;

/**
*
@author sbutton
*
*/
@XmlType(propOrder = { "manufacturer", "model", "year",
"color"
, "registration", "owners" })
@XmlRootElement(name = "vehicle")
@XmlAccessorType(XmlAccessType.PROPERTY)
public class Vehicle {
long id;
String registration;
String manufacturer;
String model;
String year;
String color;
ArrayList<Owner> owners = new ArrayList<Owner>();

public Vehicle() {
// TODO Auto-generated constructor stub
}

...
...
}

Instances of the POJOS are then created from a JSP page, where they are marshalled into an XML document and then displayed by the JSP:
<%
try {
JAXBContext context = JAXBContext.newInstance(Vehicle.class);
Marshaller marshaller = context.createMarshaller();
marshaller.setProperty(Marshaller.JAXB_FORMATTED_OUTPUT, Boolean.TRUE);

Vehicle xtrail = new Vehicle(1L, "Nissan", "X-Trail",
"2002"
, "Silver", "ABC-123");
xtrail.addOwner(new Owner(1L, "Fred", "Bloggs"));

Vehicle golf = new Vehicle(2L, "Volkswagen", "Golf",
"2002"
, "Silver", "XYZ-123");
golf.addOwner(new Owner(1L, "Fred", "Bloggs"));
golf.addOwner(new Owner(2L, "Freda", "Bloggs"));

StringWriter sw = new StringWriter();
marshaller.marshal(xtrail,sw);
out.println(escapeHtml(sw.toString()));

sw = new StringWriter();
marshaller.marshal(golf,sw);
out.println(escapeHtml(sw.toString()));

} catch (JAXBException e) {
e.printStackTrace(new PrintWriter(out));
}
%>
The application is then packaged up into a WAR and an EAR file ready for deployment.

Prepare the Server: Using ASC, publish a shared-library that contains the JAXB 2.0 JAR files.


Deploy the Application: When deploying the application, use the Classloading Task and import the "jaxb 2.0" shared-library so the application has access to the JAXB 2.0 implementation.


When the application is run, the Vehicle and Owner instances are marshalled to XML and displayed in the JSP page.


Voila.

20 September 2007

Command Line Monitoring of Thread Pool Sizes

Want to periodically view the OC4J thread pool sizes from the command line?

Using Groovy + JMX , its dead simple:
import demo.oc4j.jmx.*;
import java.text.*;

def period = 5000L
def client = new OC4JClient()
def df = DateFormat.getTimeInstance(DateFormat.LONG)

try {
client.connect("service:jmx:rmi://10.187.112.178:23791",
"oc4jadmin", "welcome1")

println "$client\n"

http = client.helper.createGroovyMBean(
"oc4j:j2eeType=ThreadPool,name=http,J2EEServer=standalone")

system = client.helper.createGroovyMBean(
"oc4j:j2eeType=ThreadPool,name=system,J2EEServer=standalone")
jca=client.helper.createGroovyMBean(
"oc4j:j2eeType=ThreadPool,name=jca,J2EEServer=standalone")


while(true) {
now = df.format(new Date(System.currentTimeMillis()));
println "$now HTTP:[$http.poolSize] JCA:[$jca.poolSize] System:[$system.poolSize]"
Thread.sleep(period)
}
} finally {
println 'Closing'
client.close()
}

This makes use of the OC4J helper library, which you can access here.

A simple script to run this would look like this:

@setlocal
set J2EE_HOME=d:\java\oc4j-10133-prod\j2ee\home
set GROOVY_HOME=d:\java\groovy-1.0
set classpath=lib\oc4jgroovy.jar;%GROOVY_HOME%\lib\commons-cli-1.0.jar;/
%GROOVY_HOME%\embeddable\groovy-all-1.0.jar;%J2EE_HOME%\admin_client.jar;%J2EE_HOME%\oc4jclient.jar

java -classpath %CLASSPATH% groovy.lang.GroovyShell src\threadlevel.groovy
@endlocal


When the script is run, it produces this sort of output:

Client is connected to: rmi://10.187.112.178:23791 oc4jadmin [connectionCaching:
true, httpTunneling:false, locale:not set]

1:03:54 HTTP:[7] JCA:[1] System:[7]
1:03:59 HTTP:[7] JCA:[1] System:[7]
1:04:06 HTTP:[7] JCA:[1] System:[7]
1:04:11 HTTP:[7] JCA:[1] System:[7]


----------------
Listening to: Ned's Atomic Dustbin - What Gives My Son?

13 September 2007

Remote copy with SCP and JDeveloper External Tools

I'm currently working on developing some examples for use cases for our Release 11 product. I tend to flick around between the IDEs I use, Eclipse and JDeveloper -- for example, I find that the support JDeveloper has for packaging J2EE applications is a bit easier to use than the analogs in Eclipse. Or perhaps its just that I've used it a bit more and know how to work around its foibles.

Anyway, the situation I ran into is that my install of 11AS is on a hosted server back at HQ. And I'm using JDeveloper 10.1.3 on my laptop here in Adelaide. So any time I wanted to deploy the applications to test them, I had to manually SCP/SFTP the application archive up to the server then deploy it. I know its trivial, but it was becoming a pain in the arse after a while. It's kind of funny how something so incidental sometimes becomes a beast of burden.

How could I make my life easier? Well I was just about to write myself a 5 line Ant script to do it, which used the task and then run that from JDeveloper to automate the copy process. But then I just happened to notice the "External Tools" menu item.
Hmm I said out loud -- could I just use that instead?

Well all you need to do is crack open the External Tools menu item and Add a new item.

To copy a file from my local PC to the server, I ultimately need a command that looks like this :

pscp -pw password username@server:/dir

All you need to do then is to fill in the relevant fields to produce that command.

There are some nice elements in the dialog that help you construct the generic command. I used three of these in my command:
  1. To allow me to enter the password when the command is run, I used the prompt directive:

    ${prompt:label=Password}

  2. To specify the file to upload, I used the file.path directive:

    ${file.path}

  3. To specify the target server, I used an environment variable substitution. I'm lazy and to avoid typing, I set the common target server details as an environment variable so that from the command line I can use some shorthand like this "pscp %SCP% ...". To include the environment variable, I used the env.var directive:

    ${env:var=SCP}
In the external tool dialog, putting it together looks like this:


Cool.

Now to put it to use.

When I want to copy an application archive up to my server for deployment, all I need to do is select the archive in the Navigator and select PSCP from the right mouse menu:


The password is then queried:


And finally the full command is constructed and run:


Voila.

One gotcha I found was that the deployment archives are not shown by default in the various JDeveloper Navigators (why it doesn't show them in a "deploy" directory in the navigator BTSOOM).

So to force JDeveloper to show you the generated archives, add the "deploy" directory to the Project Content directories:


----------------
Listening to: Ride - Twisterella

10 September 2007

Using Shared Libraries to configure Log4j

As I was mucking around with Log4j last week, it occurred to me that I could make use of the OC4J shared-library mechanism to inject the Log4J properties files into an an application when it was being deployed -- after all the properties file is just read from the classpath.

Even better, what this enables an administrator to do is to configure a set of shared-libraries that contain different log4j properties file, say enabling different log levels, and then choose between them when the application is deployed. Or additionally, make changes to in a post-deployment manner to switch between different logging settings.

OK, enough with the banal description, here's a few screen shots to show you what I'm dribbling on about here.

First off, lets assume you have a desire to capture and route your log4j entries into the OC4J log system using the OracleAppender as described here and you have a properties file that configures the appropriate settings and the log level you want to enable.

log4j.rootLogger=INFO,OJDL
log4j.appender.OJDL=oracle.core.ojdl.log4j.OracleAppender
log4j.appender.OJDL.LogDirectory=${oracle.j2ee.home}/log/oc4j
#log4j.appender.APP1.MaxSize=1000000
#log4j.appender.APP1.MaxSegmentSize=200000
#log4j.appender.APP1.Encoding=iso-8859-1
log4j.appender.OJDL.ComponentId=OracleProd

The first thing to do is to put the log4j.properties file into a JAR file, then deploy it as a shared-library to OC4J.


Once the shared-library has been published, you will see it available on the server shared-libraries page, ready to be imported. Note that in the below, I actually have two different log4j.config shared-libraries deployed.


Once the shared-library is deployed, it is then available to be imported by applications when they are deployed. By importing the log4j.info.config shared-library, the log4j.properties file is made accessible to the application and therefore used to to configure log4j for the application.

To import the shared-library during the deployment process, use the Configure Classloading button on the Deployment Tasks page.


By selecting the desired log4j.config shared-library, it will be made available to the application, and therefore dictate how the log4j log entries for the application are handled. In this specific case, the ROOT logger is set to the INFO level, and the OracleAppender is being employed to direct the log entries into the OC4J log system.

Ultimately the customized shared-library settings for the application are written into the orion-application.xml for the deployed application.


If at some point you wanted to change this application to use a lower log level such as DEBUG or TRACE then you can easily modify the import-shared-library statement to import the shared-library that has the relevant log4j.properties configuration file.

In summary, using the Oc4J shared-library mechanism and a consistent naming convention should enable you to have as many reusable log4j configurations as you need that can be applied to your applications.

----------------
Listening to: Billy Bragg - A New England

06 September 2007

Directing Log4j logs into OC4J logging system

My last posts have focussed on using the JDK standard logging API, and directing the logs being emitted into the OC4J logging system so they can be viewed and searched using the ASC LogViewer.

The log-handler mechanism we have works with the JDK standard logging constructs. The appender mechanism used by log4j is not covered by the basic configuration option in j2ee-config.xml.

However if you are using log4j, then on the surface it looks you are apparently SOL.

But if you want to get a little dirty, here's how you can also choose to redirect log4j logs into the OC4J log files.

In the OracleAS distribution, we ship a JAR file -- $ORACLE_HOME/diagnostics/lib/ojdl-log4j.jar -- that contains an OracleAppender class. Turns out, this class is a log4j appender that transforms log4j messages into the OJDL XML form.

To use this appender, simply configure it using your preferred log4j configuration mechanism. I'll use log4j.properties as an example:

log4j.rootLogger=TRACE,OJDL
log4j.appender.OJDL=oracle.core.ojdl.log4j.OracleAppender
log4j.appender.OJDL.LogDirectory=${oracle.j2ee.home}/log/oc4j
#log4j.appender.APP1.MaxSize=1000000
#log4j.appender.APP1.MaxSegmentSize=200000
#log4j.appender.APP1.Encoding=iso-8859-1
log4j.appender.OJDL.ComponentId=OracleProd

In this configuration, the log4j messages will be directed into the $ORACLE_HOME/j2ee/home/log/oc4j/log.xml file -- which is the "Diagnostics" file read and displayed by LogViewer.

To make use of the OracleAppender, you have to ensure that you have the classes available to the application to use.

One approach it to include the libraries within the application itself -- with JEE5 applications, this is dead simple using the new <librar-directory> facility, with which you specify a directory within the EAR file to hold libaries, and then plunk the libraries into that directory. EasyPeasy!

Another approach to this is to create a shared-library containing the log4j library and the ojdl-log4j.library, and then import this into the application when it is being deployed so the libraries are available to the application.

If you have a Web application, just plunk the libraries into the WEB-INF/lib directory and go.

Something to keep in mind when you are using the ojdl-log4j library is that it has a dependency on the log4j library, so they have to both be accessible at the same classloader level.

Once you have it configured, then the one log.xml file will contain log entries from OC4J, as well as any logs from log4j.

----------------
Listening to:
Powderfinger - Love your way

05 September 2007

Capturing and viewing application log messages with LogViewer

Or put another way ... directing application log messages into the OC4J logging system and viewing them.

Lets say you are wisely using some form of logging framework within your application. And when using OC4J, you use the LogViewer functionality within Application Server Control (ASC) to view the various log messages emitted by the susbsystems of OC4J. Perhaps, you think to yourself, I'd be quite convenient to also include the log messages from my application into the general OC4J log so it can be viewed from the same LogViewer.

Here's how it can be done!

I'm not getting in the religious argument as to which logging framework you are using. For pure expediency, my example will use the JDK logging API.

OK, so in your application, you are using a logger naming hierachy of some form, and using the logger to issue log messages at different levels.
Logger logger = Logger.get("foo.bar.web.EmployeeFrontEnd");

public
void doGet(HttpServletRequest request,
HttpServletResponse response) throws ServletException, IOException {response.setContentType(CONTENT_TYPE);
logger.fine(
String.format("Handling web request for %s", request.getRequestURL()));

PrintWriter out = response.getWriter();
out.println("<html>");
out.println("<head><title>EmployeeFrontEnd</title></head>");
out.println("<body>");
Employee test = Employee.getTestInstance();
logger.finest(
String.format("Test Employee Instance: %s", test));
logger.finest(
String.format("Calling %s to locate office for %s",
employeeManager.toString(),
test.identifier(test.ID_SHORT)));
String location = employeeManager.locateEmployeeOffice(test);

logger.finest(
String.format("bean returned %s for %s ",
location, test.identifier(test.ID_SHORT)));
out.printf("<p>Employee: %s</br>Office: %s</p>", test.identifier(test.ID_SHORT), location);
logger.fine(String.format("Employee currently earns $%s", test.getSalary()));
test.raiseSalary(15D);
out.printf("<p>Give employee 15percent raise, now earns %s", test.getSalary());
out.println("</body></html>");
out.close();
}

Cool.

Now if you are using standard JDK logging, you can configure the logging handlers and log levels using various mechanism, to ultimately direct the log entries from the application into some form of persistent form to view at a later point.

Now this is where the intersection with the standard logging API, OC4J and the ASC LogViewer intersect.

First off, the ASC LogViewer knows about all the log files that are generated by OC4J. Among them is the big daddy of log files -- j2ee/home/log/oc4j/log.xml -- this is known as the diagnostics log file.

How this file is constructed as a log target is done in the j2ee/home/config/j2ee-config.xml file, where the oc4j-handler is configured to use the Oracle common logging mechanism:

<log_handler name="oc4j-handler" class="oracle.core.ojdl.logging.ODLHandlerFactory">
<property name="path" value="../log/oc4j"/>
<property name="maxFileSize" value="10485760"/>
<property name="maxLogSize" value="104857600"/>
<property name="encoding" value="UTF-8"/>
<property name="supplementalAttributes" value="J2EE_APP.name,J2EE_MODULE.name,WEBSERVICE.name,WEBSERVICE_PORT.name"/>
</log_handler>

Then by convention,, the oracle naming hierachy is specified as being handled by this oc4j-handler:

<logger name="oracle" level="NOTIFICATION:1" useParentHandlers="false">
<handler name="oc4j-handler"/>
<handler name="console-handler"/>
</logger>
Thus any messages written into the "oracle" root logger will be directed to the oc4j-handler, which writes them out in XML form to the j2ee/home/log/oc4j.log.xml file.

To therefore include log messages from your application in the OC4J diagnostics log file, all you need to do is to add a new <logger> entry in the j2ee-config.xml file that specifies your logger name and the level, and declares it to use the oc4j-handler.

<logger name="foo" level="FINEST">
<handler name="oc4j-handler"/>
</logger>

Now using ASC, select the logs entry at the bottom of the page to view all the logs.


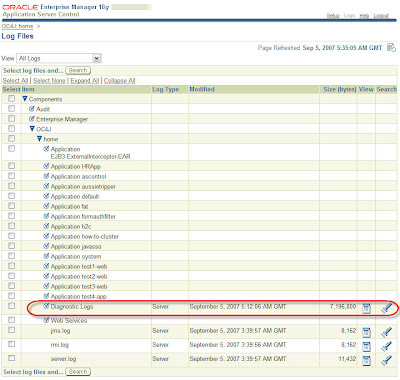
By clicking on the the Diagnostics Logs file, you should see it showing both log entries for OC4J PLUS the log entries from your application.


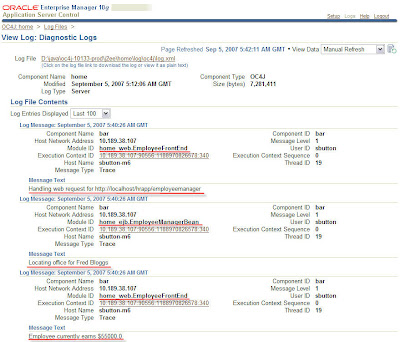
You can see from the log messages the component where the log entry was generated. From the example above you can see log messages from the web_EmployeeFrontEnd component and the ejb_EmployeeManagerBean.

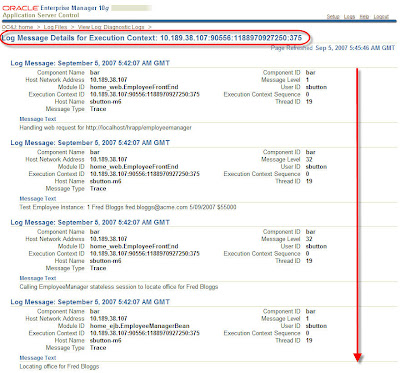
Now the really really cool thing you can do from here is to view all the log entries from the same execution path. Basically what happens is that the Oracle common logging mechanism allocates an execution context ID to every log message, which enables it to then correlate the various log entries from the different components of an execution path. By simply clicking on the Execution Context ID (ECID) link for a log entry of interest, all the log files will be searched for that ECID and each entry will then be displayed in time stamp order.

This effectively gives you the log entries, in sequence for an individual request.


How's that for a handy capability!

Once your log entries are being handled within the Oracle common logging mechanism, you can then utilize the search facilities within the LogViewer to search for items of interest. Explore away!

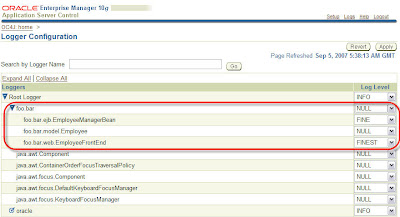
And for one final rabbit out of the hat for this blog entry, you can also use ASC to configure your application level loggers. On the Administration page, select the Configure Loggers link. If you application has run and your loggers have registered themselves (or you statically configured them in the j2ee-config.xml file) you will see the logger name listed, along with a select list to allow you to specify the levels for each logger. This lets you configure your custom application logging on the fly.


----------------
Listening to: Pixies - Here Comes Your Man

03 September 2007

Getting @ an EJBContext from External Interceptors

If you need to get at the EJBContext of the target bean from an external interceptor class, then one easy way to do it with OC4J is to lookup the following resource from within the interceptor:

EJBContext context = (EJBContext)new InitialContext().lookup("java:comp/EJBContext");

In OC4J 11 even this marginal piece of code won't be necessary as the EJBContext (and any other type of resource) can be injected directly into the interceptor.

Before I was made aware of the simpler solution above, I was resorting to using some reflection code to try and work out if there was an applicable way to get the EJBContext from the target bean. It uses first a direct field check and if that yields no results, it then looks for an accessible method that has returns an EJBContext class, or a derivative thereof.

// The EJBContext classes
final List contextClasses = Arrays.asList(
new Class[] {
javax.ejb.EJBContext.class,
javax.ejb.SessionContext.class });
/**
* Try and get the principal name from the target bean class
* @param target
* @return name of the principal
* @throws Exception
*/
String getPrincipalName(Object target) throws Exception {
String ret = getPrincipalNameFromField(target);
if(ret != null) {
return ret;
} else {
ret = getPrincipalNameFromMethod(target);
}
return(ret != null ? ret : "Ghost Rider");
}

private String getPrincipalNameFromField(Object target) throws Exception {
for(Field field : target.getClass().getFields()) {
if(contextClasses.contains(field.getType())) {
EJBContext ctx = (EJBContext)field.get(target);
return ctx.getCallerPrincipal().getName();
}
}
return null;
}

private String getPrincipalNameFromMethod(Object target) throws Exception {
Method[] methods = target.getClass().getMethods();
for (Method method: methods) {
if(contextClasses.contains(method.getReturnType())) {
EJBContext ret = (EJBContext)method.invoke(target, null);
return ret.getCallerPrincipal().getName();
}
}
return null;
}


This worked pretty well in my tests, but of course it needs the target bean class to be in a cooperative form -- the EJBontext either needs to be accessible as a public field, or there needs to be a public method to get the object from the target bean.

The JNDI lookup is easier and more reliable.

My Turner Flux

It's distinctly not OC4J or Java related, but I'm so rapt with this that I just had to express it somewhere.

My long awaited Turner Flux MTB frame has finally arrived, after close to 6 months of waiting.


I've been gathering all the parts to put on it over the last few months, so its just about ready to get built up -- I've got a sweet collection of bits for it -- Avid Juicy Carbon brakes, Race Face Deus crankset, SRAM X.0 running gear, Mavic Crossmax wheel set, Thomson seatpost and stem and more. I've just found somewhere to pick up Fox F100 RLC fork which completes the bill.

I should be living in mortal fear of my wife looking closely at the credit card bills ... but she's a total champ about it all. I think she likes getting me out of the house or maybe its because I'm a much happier bloke after a ride.

Once the build it done, I may never find the time to post another blog entry

Stop that cheering ok! :-)

Upate Sept 11: all the bits and pieces are now in place and I dropped the frame and bits into Bio-Mechanics Cycles to get it built up. Prodigy Pete seems like a top bloke, who comes very highly recommended. I think the only thing I forgot to pick up was a set of handlebar grips. Luckily Pete had some on hand. I kind of forgot to get a saddle too, so I've scavenged the Fizik Aliante off of my roadie for the time being and will see how that works out. I then may either source a Gobi, or leave the Aliante on the Turner and get my Arione back from my mate to use on the roadie.

Update Sept 20: Here's my Flux fully assembled.

It's been out for a few rides already.

Having never spent any significant time on other dual suspension rides, I can't compare it to anything else. However just in its own right, the bike is utterly fantastic. Even on the first ever ride around the block, it felt immediately comfortable. You feel like you are one with the bike and in total control.

Taking it out on the trails, the most noticeable aspect is simply how it rides. Just point and go and the bike will take you wherever you want. It floats over rocks, roots, ruts as if they weren't there. It feels like it powers through corners with the amazing amount of traction you get from the active rear end. Landing from small jumps is barely even noticeable, which lets you keep a line much more easily.

The other thing that became really apparent after a few rides was that my lower back wasn't sore at all -- riding the hardtail and bouncing around all over the shop, after an hour or so my back usually tightens up. But on this, I just didn't feel a thing.

So far, it's been a totally positive experience and I can't wait to spend some more time on it.


----------------
Listening to:
John Butler Trio - Funky Tonight

Accessing Return Values from EJB Interceptors

Continuing from my last posting regarding the application of EJB3 interceptors to existing applications, there's another interesting tidbit regarding how to access the return value of an EJB method call in an interceptor.

Thanks to some sage advice from members of our EJB team (who have authored a simply outstanding book in my opinion) turns out that you can use a simple pattern like this in your interceptor method:

public Object intercept(InvocationContext ctx) throws Exception {

// do stuff as pre-invoke
...

// Execute the bean method, or next interceptor in the chain
Object result = ctx.proceed();


// do stuff as post-invoke
...

// return the result from the handler
return result;
}


Using this pattern, you have access to the pre and post invoke states of the method call on the bean.

30 August 2007

EJB External Interceptors

Came across a situation quite recently which had a requirement for the invocation of various methods calls of an EJB to be able to logged for future auditing purposes.

The simplest answer is to use EJB3 and its Interceptor functionality in the guise of an @AroundInvoke method which gets called on every method invocation of the bean class.

Now this sounds OK if you are already using EJB3 and have access to the bean source code to modify it and add the interceptor method and the annotation.

If you don't have access to the original bean source code, you can still do it by using an external interceptor class. In this technique, you create an class external which contains interceptor method(s) and use the ejb-jar.xml file to declare the external interceptor class and bind it to the bean(s) and methods you want to apply it to.

By way of example, here's an external interceptor class:
package sab.demo.interceptors;

import javax.interceptor.InvocationContext;

public class AuditInterceptor {
public AuditInterceptor() {
}

/**
* Interceptor method which prints method call
*/
public Object logMethodCall(InvocationContext ic) throws Exception {

// The InvocationContext contains the context of the intercepted call

System.out.printf("ExternalInterceptor\n\tMethod: %s\n",
ic.getMethod().getName());

// Print out the parameter values if they exist
if(ic.getParameters().length!=0) {
System.out.printf("\tParameters: ");
boolean first = true;
String sep = ", ";
for(Object o : ic.getParameters()) {
System.out.printf(" %s", o.toString());
if(!first) {
System.out.printf("%c", sep);
} else {
first = false;
}
}
}
System.out.println();

// Carry on
return ic.proceed();
}
}
To apply this to an existing bean class, create a partial ejb-jar.xml file with the entries pertinent to the interceptor class:
<?xml version="1.0" encoding="windows-1252" ?>
<ejb-jar xmlns:xsi="http://www.w3.org/2001/XMLSchema-instance"
xsi:schemaLocation="http://java.sun.com/xml/ns/javaee http://java.sun.com/xml/ns/javaee/ejb-jar_3_0.xsd"
xmlns="http://java.sun.com/xml/ns/javaee" version="3.0">
<interceptors>
<interceptor>
<interceptor-class>sab.demo.interceptors.AuditInterceptor</interceptor-class>
<around-invoke>
<method-name>logMethodCall</method-name>
</around-invoke>
</interceptor>
</interceptors>
<assembly-descriptor>
<interceptor-binding>
<ejb-name>SomeBusiness</ejb-name>
<interceptor-class>sab.demo.interceptors.AuditInterceptor</interceptor-class>
<method>
<method-name>*</method-name>
</method>
</interceptor-binding>
</assembly-descriptor>
</ejb-jar>
When the bean is called from a client, the external interceptor is invoked and the method calls are printed to stdout:
ExternalInterceptor
Method: someBusinessMethod
Parameters: 1188441131015
The external interceptor class can be packaged within the EJB-JAR file, or alternatively, it can be packaged in a separate JAR file and included in the EAR file as a library. Using JEE5, the library can be referenced using the new <libraries ... > tag and putting the JAR file into the specified directory in the EAR file.

<application version="5">
<library-directory>libraries</library-directory>
<module>
<ejb>ejb.modulejar</ejb>
</module>
</application>
What about EJB 2.1?

Turns out this works for EJB 2.1 applications as well with some minor tweaks to the existing descriptor file.

In this case, you only really need to alter the existing ejb-jar.xml so the version is specified as "3.0" and add the interceptors tags. Whereupon OC4J (10.1.3.x) will run the bean as EJB 3.0, and apply the interceptors as specified.

Here's an example of an EJB 2.1 being converted to EJB 3.0 and the interceptors added.


<?xml version = '1.0' encoding = 'windows-1252'?>
<!--
<ejb-jar
xmlns:xsi="http://www.w3.org/2001/XMLSchema-instance"
xsi:schemaLocation="http://java.sun.com/xml/ns/j2ee
http://java.sun.com/xml/ns/j2ee/ejb-jar_2_1.xsd"
xmlns="http://java.sun.com/xml/ns/j2ee"
version="2.1" >
-->

<ejb-jar version="3.0">
<interceptors>
<interceptor>
<interceptor-class>sab.demo.interceptors.AuditInterceptor</interceptor-class>
<around-invoke>
<method-name>logMethodCall</method-name>
</around-invoke>
</interceptor>
</interceptors>
<enterprise-beans>
<session>
<description>Session Bean ( Stateless )</description>
<display-name>SomeBusiness</display-name>
<ejb-name>SomeBusiness</ejb-name>
<home>sab.demo.ejb21.SomeBusinessHome</home>
<remote>sab.demo.ejb21.SomeBusiness</remote>
<local-home>sab.demo.ejb21.SomeBusinessLocalHome</local-home>
<local>sab.demo.ejb21.SomeBusinessLocal</local>
<ejb-class>sab.demo.ejb21.SomeBusinessBean</ejb-class>
<session-type>Stateless</session-type>
<transaction-type>Container</transaction-type>
</session>
</enterprise-beans>
<assembly-descriptor>
<container-transaction>
<method>
<ejb-name>SomeBusiness</ejb-name>
<method-name>*</method-name>
</method>
<trans-attribute>Required</trans-attribute>
</container-transaction>
<interceptor-binding>
<ejb-name>SomeBusiness</ejb-name>
<interceptor-class>sab.demo.interceptors.AuditInterceptor</interceptor-class>
<method>
<method-name>*</method-name>
</method>
</interceptor-binding>
</assembly-descriptor>
</ejb-jar>


In this case, if you don't want to change the application.xml file to be versioned at JEE 5.0 and use its libraries inclusion facility, then to include the library containing the external interceptor class you can use the <library> element of the orion-application.xml file to specify the library to load:
<orion-application xsi="http://www.w3.org/2001/XMLSchema-instance" nonamespaceschemalocation="http://xmlns.oracle.com/oracleas/schema/orion-application-10_0.xsd">
<library path="InterceptorLibrary.jar"/>
</orion-application>